Installation on Windows
Prerequisites
Before proceeding with the installation, ensure you have the following set up:
✅ Git Installed – Download and install Git from: Git Official Site
✅ Git-Based Terminal Configured in Your IDE – Use Git Bash, WSL, or a terminal with Git support.
💡 Why?
- Xest requires a Git-based terminal due to its reliance on
grep. - Some installations may require Git for dependency management.
To verify Git installation, run:
git --version
If Git is installed correctly, it will return the version number.
1. Install NVM (Node Version Manager)
Step 1: Download and Install NVM for Windows
NVM for Windows is different from the Linux version. Follow these steps:
- Download the latest NVM for Windows installer from the official repository: NVM for Windows GitHub Releases.
- Run the installer (
nvm-setup.exe) and follow the installation instructions. - Restart your system after installation.
Step 2: Verify Installation
Open PowerShell or Command Prompt and run:
nvm version
If installed correctly, it will return the version number.
Step 3: Install Node.js
To install the latest version of Node.js, run:
nvm install latest
nvm use latest
To verify the installation, run:
node -v
npm -v
📌 If you encounter issues running npm -v, try the following steps
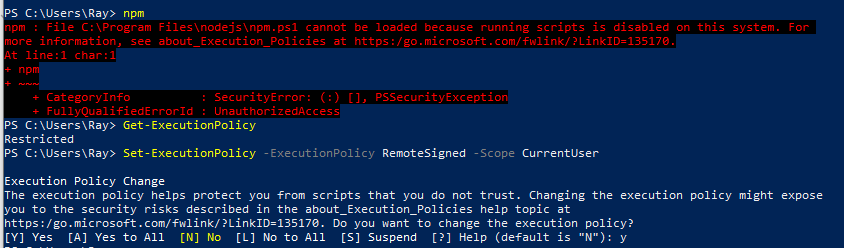
Open PowerShell as Administrator:
- Right-click on the Start menu and select "Windows PowerShell (Admin)".
- OR, search for PowerShell, right-click it, and choose "Run as Administrator".
Check your current execution policy (optional):
Get-ExecutionPolicyChange the execution policy:
For this session only (temporary):
Set-ExecutionPolicy -ExecutionPolicy RemoteSigned -Scope ProcessTo change the policy system-wide (more permanent, but still reversible):
Set-ExecutionPolicy -ExecutionPolicy RemoteSigned -Scope CurrentUserThis will allow locally created scripts to run, but remote scripts will need to be signed by a trusted publisher.
Try running npm again:
npm -v
If the issue persists, open a new PowerShell window using:
powershell -ExecutionPolicy RemoteSigned
2. Install Docker
Step 1: Download and Install Docker Desktop
- Download Docker Desktop for Windows from: Docker Official Site.
- Run the installer and follow the setup instructions.
- Enable Windows Subsystem for Linux (WSL 2) integration if prompted.
- Restart your system after installation.
Step 2: Verify Docker Installation
Run the following command in PowerShell:
docker --version
3. Install Docker Compose
By default, Docker Compose is included with Docker Desktop. To verify:
docker compose version
4. Allow Managing Docker as a Non-Admin User
Docker Desktop automatically manages permissions, but if you encounter permission issues, follow these steps:
Step 1: Run PowerShell as Administrator
Step 2: Verify your username and domain
To confirm your username and domain, run:
[System.Security.Principal.WindowsIdentity]::GetCurrent().Name
Note: This will return the username in the format DOMAIN\Username. Make sure to replace DOMAIN\Username in the command below if needed.
Step 3: Add your user to the docker-users group
net localgroup docker-users "%USERDOMAIN%\%USERNAME%" /add

Sometimes you might receive an error stating that your user is already a member. This can be ignored.
Step 4: Restart Your Computer
For the changes to take effect, restart your system.
5. Install Xest
Step 1: Install Xest CLI
Run the following command in PowerShell:
npm install -g xest
Step 2: Bootstrap Your API
Run the following command in a Bash terminal because of its dependency on grep:
xx [project-name]
Navigate into the newly created directory:
cd project-name
Step 3: Start Your Xest API
Run:
xx run